seed pod # 79

the seed pod
PROJECT
Issue 79
Red Work Pillow
© 2001 - Maria Pahls
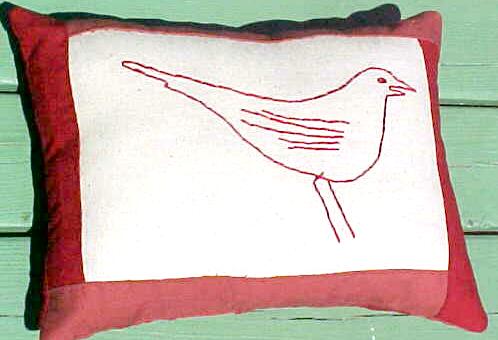
project: red work bird pillow
this simple bird can be printed out and sized to suit what ever application you choose it for. i made a pillow front with mine. here are some basic instructions for using the bird as a pillow design but you could use it as a quilt block for a red work pieced quilt, a framed piece or a sewing pocket decoration.
save the image file at right and print out using a size to suit your project. (You can click on the image to get a full size view.)
my print out is 1320 x 1130 pixels and 721dpi or 7 ˝ inches from tail to beak and 4 ˝" from top of head to feet. using a light table or bright window transfer the outline with soft pencil or disappearing ink to a good sturdy muslin or ossanberg my cloth is 12¼ x 9½.
for a pillow take into account
- any borders you will be adding (as used in this project)
- the seam allowance for sewing the front to the pillow backing.
(note that for a flat framed piece you will want to use a stretcher frame for the ossanberg and apply the red work and border while the piece is attached to the frame.)
once the design is traced use an embroidery hoop to hold the design taunt for stitching. DMC brand red # 304 is very similar traditional turkey red. decide how thick you want your stitched lines and let this be the guide to how many ply floss you stitch with. (6 ply was used for this project).
the design can be stitched with a back stitch or straight stitch. crossing over the white (on the wrong side of the stitchery) areas should be kept to a minimum. it is best to work clockwise around the design working the details (such as legs and wings) last. keep stitching size as consistent as desired, for a child-like look, use a combination of large and small stitches. to refine the look keep stitches uniform. once completed knot and snip threads. press flat with steam iron.
consider colors in deep reds and rose pink for the border. cut strips
for border twice the desired width adding 1" to total measurement for
allowances. example: pillow shown has 2 Ľ" borders before sewing to
pillow back. the pieces cut were 2.25" + 2.25" = 4.5" + 1" totaling:
6.5 or 6 ˝". once the borders are cut and sewn, slide the seam allowance
from the side to the center of the tube. press the tube flat while at
the same time pressing the seam open. lay the borders on the pillow
front with border outer edge just meeting the pillow front edge. this
will give the pillow more strength when completed.
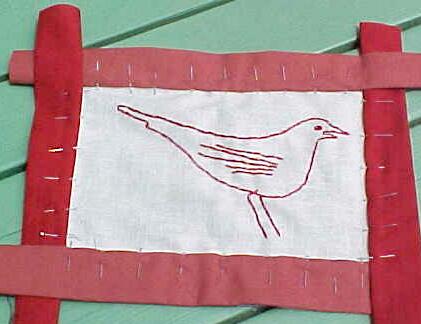 pin the borders to the pillow front and hand stitch in place. i
overlapped my edges alternately but you could miter the ends if you
wished by sewing them together at 45' angles where they meet. at
intersections where overlapped corners meet sew the bottom
most section of border to the backing first and follow with the upper
most border sewn to the top of that. when this is sewn you will not see
the stitching of the outer border side.
if you wish to see the stitching on the finished pillow stitch in ˝"
from the outer border edge.
pin the borders to the pillow front and hand stitch in place. i
overlapped my edges alternately but you could miter the ends if you
wished by sewing them together at 45' angles where they meet. at
intersections where overlapped corners meet sew the bottom
most section of border to the backing first and follow with the upper
most border sewn to the top of that. when this is sewn you will not see
the stitching of the outer border side.
if you wish to see the stitching on the finished pillow stitch in ˝"
from the outer border edge.
further embellish the pillow front with blanket stitching or beads at
this point if desired.
once borders are sewn on, measure the front and cut chosen back fabric
to the same size. pin right sides together of front and back and sew
using Ľ" allowance. leave open a small slit in one side for turning. the
back for the pillow shown is a series of 2" by 10" strips sewn together with
a Ľ" seam. the seams are pressed open before sewing to the pillow front.
 turn and fill pillow with your choice of stuffing, wool is nice or buckwheat hulls. stitch the little slit shut. you can experiment with this basic pillow and come up with lots of fun stuff. maybe embroider the bird a bit smaller on pumpkin colored fabric in black for fall. or make two smaller birds facing each other and stitch a saying in a banner under them. place the bird in a "nest" done in red work. or even embroider in golden yellow on brown fabric for a canary enthusiast or bird lover.
Click image for full size view
© 2001 maria pahls
this design is for fun only and not meant
for sale in any form finished or pattern.
All rights reserved. No part of this newsletter may be reproduced
without written permission from the publisher, except by a reviewer
who may quote brief passages in a review with appropriate credits;
nor may any part of this newsletter be reproduced, stored in a
retrieval system, or transmitted in any form or by any means --
electronic, mechanical, photo- copying, recording, or other --
without written permission from the publisher.
Issue 79 main page
For more information send
e-mail
to the Peddler.
v211.0
 HOME PAGE
Site designed at
OJ Advertising, Inc.
Site developed and maintained by
Mid-Michigan Computer Consultants
Report problems or suggestions to
support@mmcctech.com
Jackie Gannaway Cookbook Cupboard Index.